Saturday, May 21, 2011

Strapped down and ready to ride

Alright.  A few measly hours behind schedule, we are headed out onto the freeway.

Oil change.  New ratchet straps.  Lots of snacks, courtesy Summer and Susan.

The boat looks and feels sturdy.  We have the stock for oars, the gunwales, plus lots of fir plywood and odds and ends.  This is going to be fantastic.  We are both looking forward to a lot of thumbs up while rolling down the highway.

First stop is Eugene, OR. We planning to stay at the lovely abode of Gen and Germ.  Apparently they have two boats in their front yard, so we'll be right at home.


Tuesday, May 17, 2011

Time just keeps on ticking...

So here we are. Its May of 2011 and the boat still has a ways to go. We've had some obstacles to progress over the last year or so. Drew moved down to Cali, JD has been in Olympia, but he's been leaving for far away boat jobs each summer. Its meant that boat work has been relegated to the winter, which just isn't that functional or appealing in our plastic hut of a boathouse.

The latest movement on the boat front is a plan to drive it down to California.  There are a variety of reasons this might be a good idea.  To wit,
  • Drew has time on his hands, supposedly.
  • Drew has access to a shop that actually has walls. 
  • No rent is charged at said shop. 
  • JD is leaving again for the remainder of the summer. 
  • It will be fun and hilarious to drive the boat down.
As far as reasons it might be a bad idea?  There is pretty much just that one pesky one....DANGER DANGER DANGER! Okay, not really, but we will be strapping a 18 ft boat on top of JD's 14 ft pickup.  Hey, its gone 258,000 miles already, whats another 800 with a boat on top???

So, as long as we don't have any mechanical problems, encounter any massive windstorms, or blow out all our tires (knock on wood), the boat will be in CA by Wednesday of next week!

For reference, I've attached a picture of us trying on the boat for size.  Note, this is not the final loading position...

Sunday, November 22, 2009

We decided to spring for a belt sander

Recently, some coats of epoxy failed to cure smoothly. The outside of the boat is now covered in ridged epoxy, leading us to discover how annoying it is to try to scrape basically the entire hull of the boat with loud, repeatedly dulling sharpeners. Faced with another couple of hours of scraping, we decided to purchase a belt sander. Probably it'll be even louder, and take just as long, but, whatever. Maybe it will be less annoying.

We went to the box stores. Shhh. We thought that if worse came to worse, we could take the thing back. Here are a couple of videos of our visit. The first one is Lowe's, the second Home Despot. Enjoy:


In which we review the Porter-Cable Compact belt sander, the Black and Decker Dragster, the Skil belt sander, Dewalt belt power sander, and more?!


Monday, August 3, 2009

New Shop

I've mostly completed setting up the new boat shop on the west side. We're now in a pole shed with quite a bit less space than before, but a lot more light and air.

In preparation for continued work on the boat I've built a new work bench, and just today finished a big cabinet that will store our tools securely and accessibly. I'm very excited.

Tomorrow I'll be able to work on the boat straight away.

 =========================================

Edit:  Many moons later, we added plastic walls so that we could heat up the boatshop for the purpose of getting some of our epoxy to cure....check out a graphic illustration below. 


Monday, May 18, 2009

More Landing Gear

I've been working on all the pieces that will attach to the bottom of the boat to protect it. I've pretty much finished the skeg, and the rubbing strips I think I'll finish up today. Once those pieces are installed, the outside of the hull will be ready for paint.


This picture (above) shows the two pieces that make up the skeg being glued together, the bow-block coated with epoxy and down in the distance to the left are the two rubbing strips with their scarphs.


Here you can see the finished skeg sitting approximately where it will eventually be glued down. I made it substantially heavier that the designs called for, and tapered it down to 3/8". Looks pretty handsome, no?

Thursday, May 14, 2009

Bow Block

I carved a nice oak bow block to protect the bottom where it'll hit the beach a lot. It needs a little more shaping and sanding, but I think it looks nice. I also cut strips of oak for the rubbing strips that will go on either side of the bottom. Sorry, no pictures of the strips. Maybe later when I'm putting them on.

Wednesday, May 13, 2009

Gift Certificate Time

My mom, Susan, bought a fifty dollar gift certificate for Olympia Supply at an auction supporting Safeplace recently. She gave it to me, and the picture below shows the stuff I bought with it.


A bunch of sandpaper of various grit, acetone, nitrile gloves, and a little brush attachment for the shop-vac: $45.

Tuesday, May 12, 2009

Monday, May 11, 2009

Sanding, Re-Coating, Sanding, Coating Again

After all the excitement of flipping the hull over and seeing the smooth epoxy coating on the bottom, the hard (one might call it tedious) project of fairing the bottom and topsides was a little harder to get into. I (Drew) started right away though, wanting to get it over with and to move along to more interesting tasks.

I've spent a good deal of time sanding and recoating the hull to get it smooth and fair (more or less). This is very time consuming. The first go-round I went over the whole bottom with 80 grit on the belt sander. There were bubbles under the coat of epoxy that I wanted to expose so that the next coat could fill them. The mylar trick was supposed to obviate the need for additional sanding and coats of epoxy, but because of the bubbles I decided to go about the sanding and re-coating process. I think that it needed to happen anyway, because the surface was somewhat uneven and needed fairing. I ended up sanding into the fiberglass in some places because of the bumpiness, and it became much more obvious when the low areas had their sheen and the high areas were all roughed up.

This prepared the bottom for the first (and I had hoped, only) coat of epoxy after the wetting out of the glass. I coated the bottom, hoping to come back and do some sweet finish sanding and be more or less done with it. As mentioned, it didn't really work out that simply.

I hadn't realized how far we were from a smooth, fair bottom. Also, this coat picked up some dust or something and ended up pretty rough. Thankfully when I sanded again I didn't go through the epoxy to the fiberglass except where I was feathering out the glass on the garboards. The feathering looks good by the way. I scraped all the rough spots out with the scraper, then went back over everything with the orbital sander and 80 grit paper. Then I rolled on one more coat of epoxy on, which I think with a sanding to get all the whatevers out will be all we need. I sure hope so, because sanding all this epoxy and glass feels like turning expensive glue into dust (and cancer).

After reading a little more about glassing I learned that all the problems with bubbles and less than perfect transparency can be dealt with by raising the temperature of the epoxy. This makes it thinner, which in turn allows the bubbles to work themselves out before the glue starts to set up.

Apparently 70 degrees is like the absolute minimum for a perfectly clear fiberglass layup. That's probably about where we were when we did ours. Our epoxy consistency was more or less like a thick syrup. This thing I read said that it should be about as thin as water for the best wet-out results. So, on the next boat we need to remember to get the epoxy up to about 85 degrees when we're doing fiberglass so we get better flow. Also, we should spend more time sanding prior to putting anything on. I think everything post-layup would have gone much better if the surface was better smoothed out to begin with.

To say it mildly, I'm super tired of sanding and sweeping and vacuuming, but there's still a lot more cleanup left to do. I've got a hair dryer now to warm up the epoxy in all those fills on the sides. The wood flour mix becomes super hard with the epoxy fully cured (I should have scraped them off when I knew it was the right time, when the glue was still a little elastic), so it's too easy to dig in on either side of the fill. The hair dryer warms and softens so I can scrape the stuff off. Baah!
Well, we're getting there. Soon another part of the boat will be presenting problems of its own.

Saturday, May 9, 2009

Flipping Out

This was perhaps the most exciting step so far in the whole process. It didn't involve any real work, just disassembly, and moving the hull off the frame. For the first time we got to see the hull right side up, and yes, it really looks like a real boat. Like it could float us as far north as we might like to go.


Here we are unscrewing the boat from the building frame.


The boat is very light now, without any of the decks, thwarts etc that we'll add later on. Holding it like this takes very little effort at all. This will serve us well when we're hauling it up and down the beach.


Though all the imperfections are clear to the builders it looks good at a glance, and perfectionism was never our intention. Every step that we've put our effort into, however unskilled or hesitant, adds a layer of unique beauty that's specifically tuned to our own (sentimental) eyes.


There's still a lot of work to do, and flipping the boat was a little premature because the hull still needs to be cleaned up. Premature, but oh so necessary. We needed to see this thing stand alone. Now we can call it a boat, and it really is. It's a boat, sitting on its old building frame.

Thursday, May 7, 2009

This is What a Fiberglassed Bottom Looks Like

We were worried, but things turned out all right (like we knew they would). The mirror finish idea was nice, but we weren't going to use it anyway. Painting was always the plan. There were bubbles in the epoxy that needed to be sanded out, but the pictures look pretty awesome anyway, no?

Sunday, April 19, 2009

Fiberglass!


Don't worry, it's not the itchy kind (unless you tear the fabric apart into its constituent fibers).

Monday, April 13, 2009

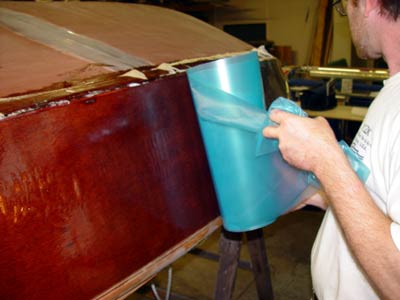
Fiberglass, epoxy and mylar sheeting

Oh yes, these are the petrochemicals we love and love to hate.

For the most part, though we call our boat a wood boat, it does contain a lot of components that are decidedly not wood. In fact I recently stumbled upon (in the non-2.0 sense of the word) a classification schema for wooden and "wooden" boats. With a "Genuine Wooden Boat" sitting at 1.1, our boat, or a "Piecewise Laminated Wooden Boat" was listed seven steps down at division 1.2.2.

Anyhow, all this is leading up discussing our recent conversations about adding a fiberglass sheathing to the bottom of the boat. Back when we were choosing plywood for the hull, we passed over locally cut/made douglas fir which requires a complete fiberglass encasing to prevent "checking." We specifically chose fancier, more expensive plywood, okoume (probably logged in Gabon, made into plywood in "France" and China) so that we wouldn't have to glass it. We didn't want the added work or cost, and we wanted something closer to a wood boat at the end of the day. Not a plastic boat with some wood inside it.

But while Okoume doesn't check, its soft. And since we want to be able to drag this boat around, land on barnacles, in surf, etc, we need the bottom of the boat to be fairly resilient. And that means in addition to some skids that we'll add, we need to cover the bottom in fiberglass.

To that end, today I traveled down to Tap Plastics, located on the northern edge of the Mission district here in San Francisco. It was recommended to me by George at Coast Marine, the excellent chandlery up near Fisherman's Wharf. Tap has a really cool old storefront, and a lot, no really, a lot, of plastic stuff. If you are in the area you should stop in sometime.

There are two main types of fiberglass, and we went with S-glass, the 4 oz version. S-glass is fancier and has a higher strength to weight ratio than the more common E-glass, but mainly we chose it for it reported ease of application and out of the potentially misguided hope that it may be more abrasion resistant. Just fyi, the S-glass was $8.50/yd at Tap, and we priced the E-glass at $17/yd at West Marine.

We will be using the same Systems Three epoxy that we've been using for the planking and framing. It should be more than adequate for the glassing we're planning.

We are also planning to try a technique that I saw described on the duckworks website. So I also picked up 16 ft of Mylar sheeting at Tap. They didn't have any available by the foot that was as thick as the .03" mentioned in the duckworks explanation, but I bought some at .005". We'll see how that treats us. Looking at some of the pictures from their step by step, I have my doubts about the accuracy of their reporting. Anyhow, the guy at Tap seemed to think .005 was fine for surfboards so we'll see.

Saturday, April 11, 2009

A Whole Boat!

At lot has been done since our last post. The boat is now fully planked. And just today Drew finished attaching the outer stem, so the hull of our boat is now complete! This is excellent progress. It looks like we will in fact have the boat ready to be able to move by May.

Before the boat will be ready we are going to put some fiberglass sheathing on the bottom of the boat to guard against abrasion during our beach landings. The fiberglass will just cover the bottom, ie the oval shaped plywood piece that is more or less parallel to the water. There will be a little overlap, and the cloth should come up an inch or two all the way around. This will help protect the base of the stem and the garboard seam, and hopefully prevent the glass from peeling off to easily.

In this picture, the starboard sheer strake (the plank closest to the basement floor) is not actually glued on. Since this shot was taken, Drew and I glued this plank on, and Drew spiled and cut out a matching plank for the port side. Brant (whose name i'm not 100% sure on how to spell) came down to help drew glue that one on. In drew's opinion, the boat looks pretty darn good. I'm excited to see it.

In D.M.'s post of March 25th, he voiced the larger goal of having the boat movable by May. It now looks like that will be totally feasable. In order to be ready to turn the boat over, which will essentially make it available to move, we just need to glass and paint the bottom. Of course, after that there will plenty of work to do before the boat is actually "done." (seats, decks, oars, oarlocks/tholepins, a name, etc).

Look for more action here in the next few days. I'll be up in Olympia for the coming weekend, and we should have access to a camera, fingers crossed.

Wednesday, April 8, 2009

Wednesday, March 25, 2009

JD, Dory, and Me Makes Three (No Camera)

Due to a severe lack of camera, I haven't taken any pictures in the boatshop in quite some time. This is part of the reason why there have been so few posts (none) since October. The other reason is that I haven't been in the boatshop very much at all. I have however been there a little. And JD has been here since my last post, and he is in fact here, in Olympia today. Which is why I'll be at the boatshop, and also why I'm posting now. Some explanation must be made, pictures or no, of the progress that has occurred and what we intend to happen from here on out. Here we go.

Since the last picture that showed the boat, I've added the next row of planks. This involved cutting a bevel into the top edge of the garboards so that the next plank would lay neatly, and with a good flat gluing surface. Once the mating surface was prepared I made a spiling pattern out of doorskin, and scarphed the planking stock for the topsides strake. Then I had to figure out how to handle the long planks , get the surfaces glued and attach them while keeping it positioned just so. I succeeded fairly well I think, but there's definitely some fixing to be done as we move on to the sheer strake.

Yesterday JD and I devised a system for pulling the lumps out of the topside plank so we can accurately cut the new bevel and fair for the sheer plank. I think we can cut the bevel today. Then we can make the pattern for the next strake. I'm thinking that it would be good to use 1/4 in. plywood for the pattern making, because it will bend more like the actual plank and won't deflect when I'm laying out the pattern to mark the spiles onto the planking stock. This probably doesn't make any sense, but it will when you see the boat. In your gut you'll know that I was spiling, avoiding deflection, cutting bevels, correcting errors, etc. and that it all adds up to a beautiful hull, right?

The big goal is to have the boat moveable by May. I'm going to be really busy, but it's a totally achievable goal. And it will put us well on track to rowing on the Sound this summer. Yesss!

Monday, October 20, 2008

San Francisco to Olympia is a Long Commute

This is a picture of a tree in the eveing light.  It is a couple blocks from the boat shop, and I walk by it every day that I go there.  For most of the year it's a fairly non-descript young maple tree, but for a couple weeks it really put on a show.


JD was here and now he has gone and I'm alone in the boat shop again.  Three days is not long enough.  However, we made a great leap in our progression toward actual boatiness.  Two garboards are glued in place, and they'll soon be ready for the next planks to be attached.  

[Warning! The next passage may contain indeciferable technical jargon.  Read at your own risk.]

I still have to cut the overhang off of the port garboard in the stern, and then check the curve of the sheer side (top) of both garboards.  Then I'll bevel the sheer edge of the garboards where the next planks will lie and we'll be ready to rock again.  I anticipate the beveling taking some time, and I need to sharpen up the planes again, but all in all things are moving along.

I won't be in the shop for a few more days as I'm working up at my mom's house, putting in some new windows, but maybe I'll get in there this weekend if Abel doesn't have any work for me.  


Tuesday, October 14, 2008

Excellent Work


Today we installed the port side garboard strake.  When I say we, I mean JD and Drew were both in attendence.  No video conferencing, no Skype chat, but real, honest to goodness person to person collaboration.  It was excellent. 

Yesterday we glued on the starboard strake.  The aft end had a moderate gap around the transom and we just filled that full of epoxy.  I think it will be great. 

The port side was a little more problematic since we broke off both of our little drill bits while drilling pilot holes.  Without a car we started to get nervous since we had already spread epoxy basically everywhere.. but we called Steph who saved our freaking asses and went to the hardware store and picked up bits.  See figure 2.1


Friday, October 3, 2008

Thinking About Oars

JD will be here soon to help with installing the garboards.  I haven't been in the boat shop much since they've been finished, but I've been doing some research into oars.  

I've found a few recomendations for the leverage ratio an oar should have, but the concensus seems to be that you should find an oar that is comfortable and moves your boat along well.  So much for formulas.

Maybe instead of jumping into building three sets, I'll build one set at a time so we can test them.