Showing posts with label techniques. Show all posts
Showing posts with label techniques. Show all posts
Sunday, April 19, 2009
Fiberglass!
Don't worry, it's not the itchy kind (unless you tear the fabric apart into its constituent fibers).

Monday, April 13, 2009
Fiberglass, epoxy and mylar sheeting
Oh yes, these are the petrochemicals we love and love to hate.
For the most part, though we call our boat a wood boat, it does contain a lot of components that are decidedly not wood. In fact I recently stumbled upon (in the non-2.0 sense of the word) a classification schema for wooden and "wooden" boats. With a "Genuine Wooden Boat" sitting at 1.1, our boat, or a "Piecewise Laminated Wooden Boat" was listed seven steps down at division 1.2.2.
 Anyhow, all this is leading up discussing our recent conversations about adding a fiberglass sheathing to the bottom of the boat. Back when we were choosing plywood for the hull, we passed over locally cut/made douglas fir which requires a complete fiberglass encasing to prevent "checking." We specifically chose fancier, more expensive plywood, okoume (probably logged in Gabon, made into plywood in "France" and China) so that we wouldn't have to glass it. We didn't want the added work or cost, and we wanted something closer to a wood boat at the end of the day. Not a plastic boat with some wood inside it.
But while Okoume doesn't check, its soft. And since we want to be able to drag this boat around, land on barnacles, in surf, etc, we need the bottom of the boat to be fairly resilient. And that means in addition to some skids that we'll add, we need to cover the bottom in fiberglass.
 To that end, today I traveled down to Tap Plastics, located on the northern edge of the Mission district here in San Francisco. It was recommended to me by George at Coast Marine, the excellent chandlery up near Fisherman's Wharf. Tap has a really cool old storefront, and a lot, no really, a lot, of plastic stuff. If you are in the area you should stop in sometime.
There are two main types of fiberglass, and we went with S-glass, the 4 oz version. S-glass is fancier and has a higher strength to weight ratio than the more common E-glass, but mainly we chose it for it reported ease of application and out of the potentially misguided hope that it may be more abrasion resistant. Just fyi, the S-glass was $8.50/yd at Tap, and we priced the E-glass at $17/yd at West Marine.
We will be using the same Systems Three epoxy that we've been using for the planking and framing. It should be more than adequate for the glassing we're planning.
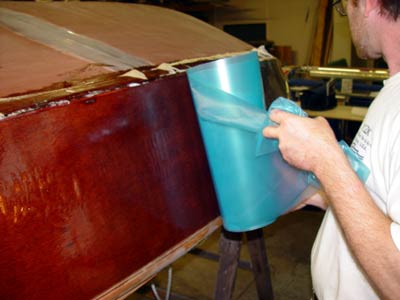
We are also planning to try a technique that I saw described on the duckworks website. So I also picked up 16 ft of Mylar sheeting at Tap. They didn't have any available by the foot that was as thick as the .03" mentioned in the duckworks explanation, but I bought some at .005". We'll see how that treats us. Looking at some of the pictures from their step by step, I have my doubts about the accuracy of their reporting. Anyhow, the guy at Tap seemed to think .005 was fine for surfboards so we'll see.
For the most part, though we call our boat a wood boat, it does contain a lot of components that are decidedly not wood. In fact I recently stumbled upon (in the non-2.0 sense of the word) a classification schema for wooden and "wooden" boats. With a "Genuine Wooden Boat" sitting at 1.1, our boat, or a "Piecewise Laminated Wooden Boat" was listed seven steps down at division 1.2.2.
 Anyhow, all this is leading up discussing our recent conversations about adding a fiberglass sheathing to the bottom of the boat. Back when we were choosing plywood for the hull, we passed over locally cut/made douglas fir which requires a complete fiberglass encasing to prevent "checking." We specifically chose fancier, more expensive plywood, okoume (probably logged in Gabon, made into plywood in "France" and China) so that we wouldn't have to glass it. We didn't want the added work or cost, and we wanted something closer to a wood boat at the end of the day. Not a plastic boat with some wood inside it.
But while Okoume doesn't check, its soft. And since we want to be able to drag this boat around, land on barnacles, in surf, etc, we need the bottom of the boat to be fairly resilient. And that means in addition to some skids that we'll add, we need to cover the bottom in fiberglass.
 To that end, today I traveled down to Tap Plastics, located on the northern edge of the Mission district here in San Francisco. It was recommended to me by George at Coast Marine, the excellent chandlery up near Fisherman's Wharf. Tap has a really cool old storefront, and a lot, no really, a lot, of plastic stuff. If you are in the area you should stop in sometime.
There are two main types of fiberglass, and we went with S-glass, the 4 oz version. S-glass is fancier and has a higher strength to weight ratio than the more common E-glass, but mainly we chose it for it reported ease of application and out of the potentially misguided hope that it may be more abrasion resistant. Just fyi, the S-glass was $8.50/yd at Tap, and we priced the E-glass at $17/yd at West Marine.
We will be using the same Systems Three epoxy that we've been using for the planking and framing. It should be more than adequate for the glassing we're planning.
We are also planning to try a technique that I saw described on the duckworks website. So I also picked up 16 ft of Mylar sheeting at Tap. They didn't have any available by the foot that was as thick as the .03" mentioned in the duckworks explanation, but I bought some at .005". We'll see how that treats us. Looking at some of the pictures from their step by step, I have my doubts about the accuracy of their reporting. Anyhow, the guy at Tap seemed to think .005 was fine for surfboards so we'll see.
Monday, September 22, 2008
The New Table, The New Garboard, The News on Scarphing
I built this huge table for laying out the planking and gluing it. It's made of a 4' x 10' sheet of 1" MDO. It's plywood that has a leveled surface that's covered with paper. It's easy to draw on, and really smooth and flat. I was hoping it would be a little stiffer, but it's good enough for a gluing surface. The half sheets are light enough to move around easily by myself, so I unscrew them from the horses and double them to make a stiff enough surface for scarphing.


I glued the port garboard scarphs today. I'm definitely getting better at it. I think that these ones are going to turn out pretty well. Better than the last seven anyway. Maybe by the time we get to the sheer strake I'll be expert at this plywood scarphing thing.
The most important things I've learned are things that I "knew" already. The subsurface (the bench or whatever the scarphed objects are sitting on) really has to be perfectly flat, at least the part directly under the scarphing zone and a bit past. Otherwise the plane will bridge over the low spots or take too much off the high spots. The clamping strip that's nailed or screwed through the scarph should really be exactly the width of the scarph. It's also nice to wrap the strip in plastic and staple it on so there's no plastic flapping around, allowing a clear view of the joint once it's clamped.
Tuesday, September 9, 2008
Patterns and Spiling
I've finally finished all the fairing. The new battens (thank you John Gardner and Howard Chapelle for the dimensions) made what was once almost impossible into a relatively easy task. I still spent several days working my way along each frame, making the bevel just right to accept the planking.

Yesterday, I ended the day making the pattern for the garboard plank. This is really exciting because it means we've made it to the next major part of the project (and the part that makes the boat a boat). We're now separating the inside of the boat from the outside, making it a floatable object.


Today I finished making the garboard pattern, and spiled the shape of the plank-to-be onto it. Spiling is the process of transfering a three dimensional shape onto a flat piece of something (probably wood) that's held against the object. In this case the object is the hull of the boat, the transfer tool is a compass, and the flat spiling stock is 1/8 inch plywood bent around the frames of the boat. (The pictures will make it a little clearer.)

After finishing the pattern and spiling, my problem this morning went something like this: I have one eight by four foot piece of plywood to make the garboard plank with. The plank is about 17 feet long by twenty or so inches wide with a big curve. How did I get 17 feet out of 16 feet? Very carefully. Look at the pictures to discover my fancy style.


Subscribe to:
Posts (Atom)